This step by step tutorial will show you how to get the Musical Memory songs into the Cloudbeats app on your iPhone. For Android users, check out the list of recommended apps here.
Make sure you get the paid version of Cloudbeats! It’s a 1 time purchase of $6.99 and the free one works differently from this tutorial.
You can follow this tutorial below via video or step-by-step screenshots.
Words/ Pictures Tutorial
Step 1 – Open the receipt email you automatically received after purchase. It has the download links. Click the circled part that says “All Songs.” Then choose Safari.

Step 2 – Wait for it to load. The file is big, so it might take a while.

Step 3 – (pictured below, left to right) Once it’s down downloading the zip file, you’ll see something like the screen below.
Click the “more” button. Then pull the options up by dragging your finger up where the red dot shows.
Click Save to Files.
Choose On my iPhone. In order to choose on my iPhone, collapse the entire menu so that your screen looks exactly like mine does below on the right. Once “On My iPhone” is gray as shown below, click save in the upper right hand corner.

Step 4 – Now we need to go find that file we just saved and unzip it in order to access the songs. To find the file, search your iPhone for the Files app. (Click the search button. Type Files. Choose the Files app.)

Step 5 – This is one of the most important steps! You need to pay attention to where you put the songs file. You will need this in step 10!!
You want to see the Browse/ search option in the files app like shown below on the left. If you see some sort of random files and folders as shown on the right, click the browse arrow so you see something like the center picture below where you can choose locations. It does not matter where you put the files, as long as you know which folder they are in. I chose to put them in the iCloud Drive folder (shown below, center and right).
Click Save (shown below, right.)
When you’re done, you have something like what’s shown on the right. Go on to Step 6.

Step 6 – Now you have to go open the folder where you just saved the songs. For me, that’s “iCloud Drive.” Do the “search/ files” thing described in step 4 to get to the Files app. Find & click the folder you saved it in. (2nd photo below.)
Click the zip file & a folder will open. (3rd & 4th photos below.)

Step 7 – Open that folder and you’ll see all the different songs sorted by subject as well as a weekly playlist folder. Yay! (Pictured below) You’re almost done. Now we’ll go to the Cloudbeats app and import the songs into the app from that folder.

Step 8 – Open the Cloudbeats app. Login & create an account if needed. (Not pictured.)
Step 9 – Regardless of what your home screen in Cloudbeats looks like, navigate to the “offline” section of the app by clicking the hamburger menu in the upper right hand corner and clicking “offline.”

Step 10– Click the word folders then click the little download arrow (pictured below, left.)
Click iCloud folders. You should see the Yearly Songs folder from step 6 here. Click the folder.
**If not, click the word browse and go find the folder where you stored your songs in steps 5-6.**

Step 11 – after you click the folder in the upper right picture above, you should see the 6 albums that the program comes with in folder form. (below left.)
You’re going to repeat this process for all 6 folders, so start with whichever you want. I started with the Year 2 Weekly folder. Click it.
Click open. (2nd photo below)
Then, that folder/ album/ playlist will open in Cloudbeats! Give it a minute to appear. (3rd photo below)
If you click “Albums” under the word “Offline,” you’ll see a more traditional album look with the album cover image (pictured below, far right.)

Step 12 – repeat that process for the other 5 folders! Then you’re done. You now have all our music downloaded to your device for playing any time, any where.
Way to go!
Bonus Pro Tip for the Future!
If you made it to the end – nice job!! That’s kind of a lot, but it’s also the basic process for always getting audio from your computer into your phone. Now that you know how, hopefully it’ll feel easier in the future.
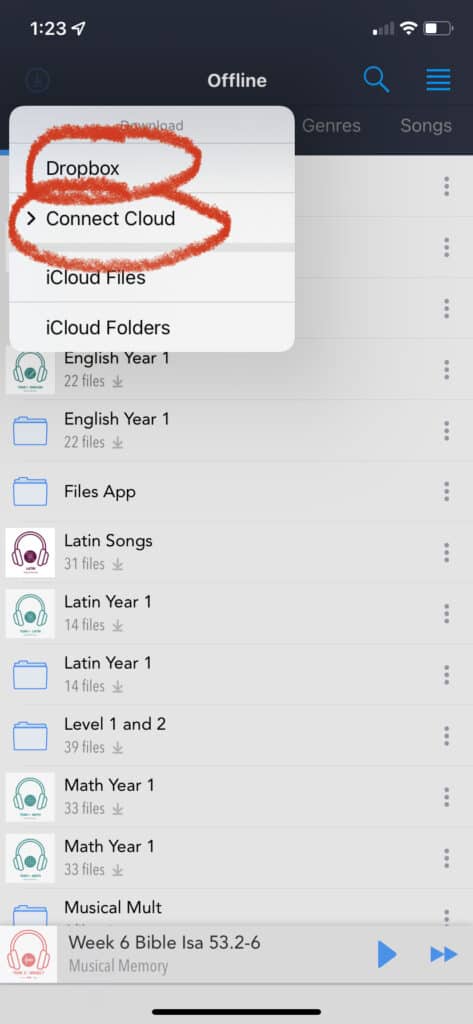
I actually do this for ALL homeschool audio files that we use – audiobooks for Story of the World, our audio poetry curriculum from IEW, & more. Sometimes, rather than downloading on my phone like we did in steps 1-7, I just download onto my computer and put the files into Dropbox or Google Drive. Then I jump straight to Cloudbeats (Step 9 in this tutorial), go to the offline section, and click that download arrow in the upper left. But if I’m wanting to access files that are in Dropbox/ Google Drive, I click “Connect Cloud” and sign into the account I want to connect. Once you sign in, you’ll be able to see your entire Dropbox/ Google Drive folder and just choose folders in there. I have an IG highlight demoing this entire process of getting files from a CD or your computer onto your phone. It’s under my Audio help! highlights here.